
***Please, if you do use these instructions, I would love it if you would post a comment with a link to your picture so that I can see your work. It would really make me happy! Happy stitching!**
I promised my friend Amanda to try to make some instructions on how to finish these scissor cases. So last night, when I finally had finished the stitching part on Indigo Rose’s ‘Wildflower Hearts’ (freebie found here) I made it into a scissor case and took pictures of the progress. It was a lot of fun! So here goes, my first attempt at describing how I make anything! LOL! Wish me luck! And if you have any questions just ask and I will try to get back to you as soon as possible.
——————————————————————————–

First you need your stitched piece and a piece of fabric of the same size (or slightly smaller, only by 2 stitches or so) for the inside. You need to backstitch (I use Pearl Cotton for backstitching and Whip stitching as it is stronger than regular floss) around your stitched piece, about 4 threads from the finished stitching. For instance, the white piece (the outside of the scissor case) is 82×82 backstitches and the pink piece (the inside of the scissor case) is 80×80 backstitches. Cut your fabric about 6-8 threads (it varies on the fabric you are using, some fabrics fray more than others) from the backstitched edge and trim the corners a little.
Press your pieces and fold the edges to the back of the pieces.

Start at a corner and stab your threaded needle under the first stitch on both pieces with the wrong sides together (the right side facing out) and pull your needle through. Go under the next stitches of both front and back piece and pull. This is called Whip Stitching.

Continue Whip Stitching until you have reached the end of the first edge.

Fold the next edge, be careful to press the corners with your fingers and continue whip stitching the backstitched edges together.
Before you close the squares up, be sure to attach ribbon so that you will be able to close your scissor case.

I thread my needle with it, pull it through the stitches and tie a knot at the back.


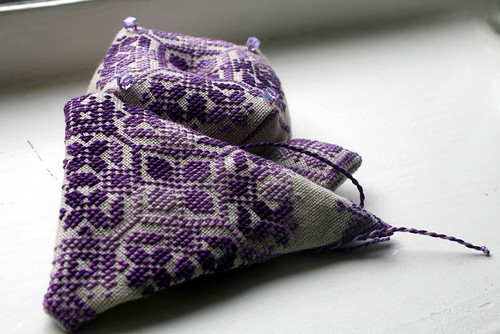
Finish the Whip Stitching and close your squares up on all four sides. Then fold your piece (see picture) and press it with a hot iron.

Next you need to stitch the edges on the front together to close it up and make the pocket that the scissors will stay in. Thread your needle, secure the end and start Whip Stitching these two edges also. You will be Whip Stitching the already Whip Stitched edges so it might get a little rough on your fingers. Be sure to pull on your thread to close it up nicely. Don’t pull too hard though :o)

Continue all the way down. The end will probably bee a little bulky, but that is to be expected unless you use regular cotton fabric (quilting fabric or the like) for the inside).

Put the scissors in the pocket and close with the top flap. Measure where to attach your button and then sew it on in the correct spot.
Voila! You have now created a beautiful scissor case for your favorite pair (or pairs 😉 ) of scissors!


HI Linda,
I am about to start this scissor case for the HOE Freebie exchange. I plan on using a freebie from My Aunts Atic in shades of teal green. It would match a piece of silk dupioni I have. Would that fabric work or should I use a cotton?
Thanks for your help
Shay
Shay ,
Your tutorial is excellent.
Thank you..:)
Woops forgot ths say THANKS for the tutorial. It’s the greatest
Shay
Great tutorial, thanks. The stitching is so beautiful! You are a gifted stitcher.
Wonderful tutorial, thanks a million Linda! I found them extremely easy to use, and I think my scissors case turned out well, if I do say so myself 🙂 Here is a link to the post http://munnersstitching.blogspot.com/2008/06/been-awhile.html
Thanks again!
Dear Linda,
thanks for wonderful instructions! I used the same chart (just to be sure that the scissor case will not be too small :)), and finished using your instructions. I love the result!
http://xvaidax.blogspot.com/2008/07/indigo-rose-wildflower-hearts.html
Thanks for the tutorial, Linda. I’ve looking high and low for this tutorial. Now I can try to do it for my collection… 🙂
Charlene
Hiya Linda – just wondering whether I could ask you if you’d be happy to run this same tutorial over on the Focus on Finishing blog some time? I had another tutor lined up to do the same thing, but she felt it would be doubled-up as yours is so clear and well put together 🙂 If you’re interested, drop me a line and we can take it from there.
Hugs, Anne
One thousand thank you for this tutorial. It is great and in more your cases with scissors are magnificent!
Thank you for the great instructions, i have a pic of the scissor case i made here and on my blog.
http://good-times.webshots.com/photo/2140201150102785367gFMfJx
Wonderful instructions the way of stitching.
Just this week I did make a scissor case, didn’t know how to close and to use the inside material, but now I do.!!! Thank you…
also to reference of the freebie Indigo rose … it’s a lovely pattern.
Cathrina
the netherlands
Thanks you for such clear directions, you do such good work
I love your directions i made 2 cases using them.I kept 1 for myself and the other i gave as a gift.Thank you so much. Terry
http://good-times.webshots.com/album/572416178IsyiAQ
i enjoyed your directions for finishing the scissor case and loved the different cases you have made. i was wondering who the different designers were and if those designs were still available.
thank you again,
mandi
Beautiful in “pumpkin”!
Hello thanks for your directions I have been looking for something like this and I will soon start one using your tutorials. As soo as I finish I will show you my work. I have the intention to do the design by myself too.
Bonjour!
Merci beaucoup pour ce tuto! Moi qui suis toujours en train de chercher mes ciseaux, je vais m’y mettre tout de suite!!!
Bonjour
Merci beaucoup pour ce tuto il est superbe C’est une bonne idée pour protéger les ciseaux Bonne journée Christine
bonjour
elles sont superbes toutes ces pochettes
bravo à toutes
merci pour ce tuto ! tres bonnes explications !
tres jolies photos et felicitations aux brodeuses
bises de lili
россия рулит
How wonderful to see all of the photos of the sets you have made together in one post. Fabulous!
Merci pour cette belle réalisation.
Очень красивые работы, просто загляденье!!!
I just found your site, by way of xstitchhappy. I have a question on the Triangle scissor case…if the liner fabric has fewer backstitches then the stitched piece…what happens to the extra stitches when you whip them together??? Thanks so much. Carolann Dunaske
Pingback: cross stitchery « jennifer’s blog
Thanks so much for so generously sharing this tutorial! I followed it to make this case – http://jenniferhoel.wordpress.com/2011/05/18/cross-stitchery/. Great instructions!
thanx for sharing
Hi! Greetings from Finland! I love your blog! Your quilts are so fantastic!!! Я люблю вашу страну, потому что я православный. http://www.quiltworld2.blogspot.com
Yours, Ulla
Buongiorno. Complimenti per il tutorial è molto interessante. Potrebbe mandarmi lo schema?
Pingback: Leiðbeiningar að þríhyrndu skæraveski | Innihald.is | Afþreyingar- og fréttasiða
Thank you for the lovely instructions. I have been making scissors cases of my own design, but yours is much nicer and just as easy to do!
Martha
J’aimerais comment recevoir les grilles de ces ouvrages très beaux
Pingback: cross stitchery – jennifer's blog
Thanks for the excellent tutorial. I may use it as a basis for a program with my embroidery guild. Here’s my blog post showing my triangular scissor case: https://www.blogger.com/blog/post/edit/2322117973728486624/53671157917008381?hl=en
Oops! Here’s the correct link: https://notjustaboutknitting.blogspot.com/
Good grief! THIS is the link: https://notjustaboutknitting.blogspot.com/2022/03/auditions.html